Quick Info
Description
This plug-in includes steps for installing and updating applications in the IBM WebSphere Liberty Profile, working with the profile configuration, and managing Liberty collectives.Quick Info
launch-websphereliberty-23.1154049.zip
Uploaded: 23-Mar-2023 08:59
launch-websphereliberty-22.1134888.zip
Uploaded: 12-Jul-2022 11:43
launch-websphereliberty-21.1100824.zip
Uploaded: 11-Mar-2021 05:20
-
 Summary
 -
 Usage
Usage -
 Steps
Steps -
 Examples
 -
Article: Deploying Liberty (Part 1)
-
Article: Deploying Liberty (Part 2)
Summary
The IBM WebSphere Application Server Liberty profile is a lightweight configuration of IBM WebSphere Application Server. It provides rapid deployment of applications for use in the development process. You can use the plugin to complete the following task:
- Working with servers in the profile
- Install, update, and uninstall applications
- Work with Liberty collectives
- Configure the Liberty server
This plugin includes one or more steps, click Steps for step details and properties.
Compatibility
This plugin requires version 6.0 or later of HCL Launch.
This plugin was tested with WebSphere Liberty profile versions 8.5.5.9 16.0.0.2.
Installation
See Installing plugins in HCL Launch for installing and removing plugins.
History
The following table describes the changes made in each plugin version.
| Version | Description |
|---|---|
| 22 | Minor Fix – to pick JAVA_HOME set as per agent on linux machine |
| 21 | Minor enhancements |
Usage
To use the Wait for Application to be STARTED step, you must complete the following steps to configure the REST connector for the WebSphere Application Server Liberty profile:
- In the
server.xmlfile on the server, enable the REST connector, SSL certificates, and an administrator role for a user or group. You must use an administrator account to run the Wait for Application to be STARTED step. For more information, see the documentation for your version of the WebSphere Application Server Liberty Profile. For example, for version 8.5, see the following topic: Configuring secure JMX connection to the Liberty profile - Update the server to listen on all endpoints. For example, the default
server.xmlfile contains a line that is similar to the following example:<httpEndpoint host="localhost" httpPort="9080" httpsPort="9443" id="defaultHttpEndpoint"/>In this code, set the host attribute to the wildcard character (*), as shown in the following example:
<httpEndpoint host="*" httpPort="9080" httpsPort="9443" id="defaultHttpEndpoint"/>
Steps
The following process steps are available in the WebSphere Liberty plugin
- Create Collective
- Create Server
- Delete Server
- Generate Component-Resource Properties
- Generate Plugin Config
- Install Server Archive
- Install or Update Application with Server XML
- Install or Update Applications with Dropins
- Join Collective
- Merge Plugin Config
- Propagate Plugin Config
- Register Host
- Replace Variable Values with Component-Resource Properties
- Start Application
- Start Server
- Stop Application
- Stop Server
- Uninstall Application from Dropins
- Uninstall Application with Server XML
- Unregister Host
- Update Host
- Upload File To Collective Host
- Wait for Application to be STARTED
Create Collective
Create a new collective controller configuration in the WebSphere Liberty Profile.
| Name | Type | Description | Required |
|---|---|---|---|
| Additional command arguments | String | Any additional arguments that should be passed to the collective create command | No |
| Keystore Password | Password | The password to use for the generated keystores | Yes |
| Password | Password | The password to include in quickStartSecurity XML node | Yes |
| Server Name | String | The name of the server to act as the collective controller | Yes |
| User Name | String | The name of the user to include in quickStartSecurity XML node | Yes |
| WebSphere Liberty Installation Directory | String | The base directory of the WebSphere Liberty profile installation, such as /opt/IBM/WebSphere/Liberty/ | Yes |
| WebSphere Liberty User Directory | String | The directory where WebSphere Liberty server configuration is held. Specify a value here when ${wlp_install_dir}/usr is not writable. |
No |
Create Server
Create a server in the WebSphere Liberty profile.
| Name | Type | Description | Required |
|---|---|---|---|
| Server Name(s) | String | The name of the server(s) to create. Multiple server names are separated by commas. | Yes |
| WebSphere Liberty Installation Directory | String | The base directory for the WebSphere Liberty profile installation. For example: /opt/IBM/WebSphere/Liberty/ |
Yes |
| WebSphere Liberty User Directory | String | The directory where WebSphere Liberty server configuration is held. Specify a value here when ${wlp_install_dir}/usr is not writable. |
No |
Delete Server
Delete a server in the WebSphere Liberty profile.
| Name | Type | Description | Required |
|---|---|---|---|
| Server Name(s) | String | The name of the server(s) to delete. Multiple server names are separated by commas. | Yes |
| WebSphere Liberty Installation Directory | String | The base directory of the WebSphere Liberty profile installation. For example: /opt/IBM/WebSphere/Liberty/ |
Yes |
| WebSphere Liberty User Directory | String | The directory where WebSphere Liberty server configuration is held. Specify a value here when ${wlp_install_dir}/usr is not writable. |
No |
Generate Component-Resource Properties
Generate Component-Resource properties from variable tags in the server.xml file
| Name | Type | Description | Required |
|---|---|---|---|
| Location of the server.xml file | String | The location of the server.xml file to be processed. | Yes |
Generate Plugin Config
Generate plugin configuration for a WebSphere Liberty server.
| Name | Type | Description | Required |
|---|---|---|---|
| Install Root | String | The installation root to add to the plugin configuration. This property is required if Server Name is specified. |
No |
| Password | Password | The password for WebSphere Liberty. | Yes |
| Server HTTPS Port | String | The HTTPS port of the server. | Yes |
| Server Hostname | String | The host name or IP address of the server. | Yes |
| Server Name | String | The name of the server to add to the plugin configuration. This property is required if Install Root is specified. |
No |
| Trust Store File Path | String | The path to the trust store file. This path can be relative or absolute. | Yes |
| Trust Store Password | Password | The password for the trust store file. | Yes |
| User Name | String | The user name for WebSphere Liberty. | Yes |
Install Server Archive
Install a WebSphere Liberty archive file.
| Name | Type | Description | Required |
|---|---|---|---|
| Accept License | Boolean | Select to automatically accept the license if extracting from a jar file. | Yes |
| Source File | String | The archive file to extract. | Yes |
| WebSphere Liberty Installation Directory | String | The base directory of the WebSphere Liberty profile installation, such as /opt/IBM/WebSphere/Liberty/ | Yes |
| WebSphere Liberty User Directory | String | The directory where WebSphere Liberty server configuration is held. Specify a value here when ${wlp_install_dir}/usr is not writable. |
No |
Install or Update Application with Server XML
Install or update an application in the WebSphere Liberty profile by editing the server.xml file.
| Name | Type | Description | Required |
|---|---|---|---|
| Application Name | String | The name of the application to install. | Yes |
| Application Type | String | The type of application archive. Valid values are war, ear, eba, and esa. | Yes |
| Auto Start | Boolean | Select to configure the application to start automatically when the server starts. | No |
| Context Root | String | The context root of the application. | No |
| Server Name | String | The name of the server to install the application into. | Yes |
| Source File Location | String | Location of the application, expressed as an absolute path or a path that is relative to the server-level apps directory. |
Yes |
| WebSphere Liberty Installation Directory | String | The base directory of the WebSphere Liberty profile installation. For example: /opt/IBM/WebSphere/Liberty/ |
Yes |
| WebSphere Liberty User Directory | String | The directory where WebSphere Liberty server configuration is held. Specify a value here when ${wlp_install_dir}/usr is not writable. |
No |
Install or Update Applications with Dropins
Install or update an application in WebSphere Liberty by using the dropins directory.
| Name | Type | Description | Required |
|---|---|---|---|
| Server Name | String | The name of the server to install the application into. | Yes |
| Source File | String | The archive file (for example, an EAR or WAR file) that contains the application to install. |
Yes |
| WebSphere Liberty Installation Directory | String | The base directory of the WebSphere Liberty profile installation. For example: /opt/IBM/WebSphere/Liberty/ |
Yes |
| WebSphere Liberty User Directory | String | The directory where WebSphere Liberty server configuration is held. Specify a value here when ${wlp_install_dir}/usr is not writable. |
No |
Join Collective
Join a server to the collective controlled by the designated controller.
| Name | Type | Description | Required |
|---|---|---|---|
| Additional command arguments | String | Any additional arguments that should be passed to the collective join command | No |
| Admin Password | Password | The password for the Administrator user for the target Collective Controller | Yes |
| Admin User Name | String | An Administrator user for the target Collective Controller | Yes |
| Collective Controller Host Name | String | The host name of the target Collective Controller | Yes |
| Collective Controller Port | String | The HTTPS port number of the target Collective Controller | Yes |
| Keystore Password | Password | The password to use for the generated keystores | Yes |
| RPC User | String | The user with which to authenticate to the RPC mechanism | No |
| RPC User Password | Password | The password for the rpcUser. Only one authentication option (rpcUserPassword or sshPrivateKey) should be used, but not both. |
No |
| SSH Private Key Password | Password | The password for the specified SSH key | No |
| SSH Private Key Path | String | The path to the SSH key to use to authenticate to the host. Only one authentication option (rpcUserPassword or sshPrivateKey) should be used, but not both. |
No |
| Server Host Name | String | The name of the collective host where the server to join resides | No |
| Server Name(s) | String | The name of the server(s) that will join the Collective. Multiple server names are separated by commas. |
Yes |
| Trust Store File Path | String | The path to the trust store to be used when connecting to the collective controller | No |
| Trust Store Password | Password | The password for the trust store file. | No |
| WebSphere Liberty Installation Directory | String | The base directory of the WebSphere Liberty profile installation, such as /opt/IBM/WebSphere/Liberty/. This path is on the host where the server joining the collective resides. |
Yes |
| WebSphere Liberty User Directory | String | The directory where WebSphere Liberty server configuration is held. Specify a value here when ${wlp_install_dir}/usr is not writable. |
No |
Merge Plugin Config
Merge multiple plugin-cfg.xml files into one xml for web servers for clarity and eliminate errors caused by dealing with multiple config files.
| Name | Type | Description | Required |
|---|---|---|---|
| Source Directory | String | Location of the source directory where all the plugin files are located, or a comma separated list of source plugin file names specified as full filepaths |
Yes |
| Target Directory | String | Parent directory of the merge-plugin-cofig file Optional. By default the merged file is generated in the same directory where pluginUtility.sh is located and named merged-plugin-cfg.xml. Users can either specify the directory name where the merged file must be placed, or a fully qualified file name. In case there is already a file named merged-plugin-cfg.xml or the specified file specified file name is already present, then the contents of the file will be overwritten. |
No |
| WebSphere Liberty Installation Directory | String | The base directory for the WebSphere Liberty profile installation. For example: /opt/IBM/WebSphere/Liberty/ |
Yes |
| WebSphere Liberty User Directory | String | The directory where WebSphere Liberty server configuration is held. Specify a value here when ${wlp_install_dir}/usr is not writable. |
No |
Propagate Plugin Config
Make the merged plugin config xml available to the web server.
| Name | Type | Description | Required |
|---|---|---|---|
| Plugin-Config File | String | Full filepath of the plugin config xml targeted for use by the web server. This is produced by the Merge Plugin Config step. |
Yes |
| Web Server Home | String | The install directory of web server. For example: /opt/IBM/HTTPServer | Yes |
| WebSphere Plugins Home | String | Full path to top-level directory where WebSphere Plugins are installed. This directory contains libraries used to connect WebSphere Liberty servers to web servers. |
Yes |
Register Host
Register a new host with the collective controlled by the designated controller.
| Name | Type | Description | Required |
|---|---|---|---|
| Additional command arguments | String | Any additional arguments that should be passed to the collective registerHost command | No |
| Admin Password | Password | The password for the Administrator user for the target Collective Controller | Yes |
| Admin User Name | String | An Administrator user for the target Collective Controller | Yes |
| Collective Controller Host Name | String | The host name of the target Collective Controller | Yes |
| Collective Controller Port | String | The HTTPS port number of the target Collective Controller | Yes |
| Host JAVA_HOME Path | String | The path to the Java home directory for the registrant. | No |
| Host Name | String | The name of the host that will be registered with the Collective | Yes |
| Host Read Path | String | A readable path for the file transfer operations originated from the controller. Specify multiple paths on separate lines. |
No |
| Host Write Path | String | A writable path for the file transfer operations originated from the controller. Specify multiple paths on separate lines. |
No |
| RPC User | String | The user with which to authenticate to the RPC mechanism | No |
| RPC User Password | Password | The password for the rpcUser. Only one authentication option (rpcUserPassword or sshPrivateKey) should be used, but not both. |
No |
| SSH Private Key Password | Password | The password for the specified SSH key | No |
| SSH Private Key Path | String | The path to the SSH key to use to authenticate to the host. Only one authentication option (rpcUserPassword or sshPrivateKey) should be used, but not both. |
No |
| WebSphere Liberty Installation Directory | String | The base directory of the WebSphere Liberty profile installation, such as /opt/IBM/WebSphere/Liberty/ | Yes |
| WebSphere Liberty User Directory | String | The directory where WebSphere Liberty server configuration is held. Specify a value here when ${wlp_install_dir}/usr is not writable. |
No |
Replace Variable Values with Component-Resource Properties
Replace variable values in the server.xml file with Component-Resource properties
| Name | Type | Description | Required |
|---|---|---|---|
| Location of the server.xml file | String | The location of the server.xml file to be processed. | Yes |
Start Application
Start an application in the WebSphere Liberty profile.
| Name | Type | Description | Required |
|---|---|---|---|
| Application Name | String | The name of the application to start. | Yes |
| Password | Password | The password for WebSphere Liberty. | Yes |
| Server HTTPS Port | String | The HTTPS port of the server. | Yes |
| Server Hostname | String | The host name or IP address of the server. | Yes |
| Trust Store File Path | String | The path to the trust store file. This path can be relative or absolute. | Yes |
| Trust Store Password | Password | The password for the trust store file. | Yes |
| User Name | String | The user name for WebSphere Liberty. | Yes |
Start Server
Start one or more servers in the WebSphere Liberty profile. This step will create output properties named startedServers, alreadyStartedServers, and failedServers. Servers that were successfully started will be listed in the startedServers output property. Servers that were already in the started state will be listed in the alreadyStartedServers output property. Servers that failed to start will be listed in the failedServers output property.
| Name | Type | Description | Required |
|---|---|---|---|
| Admin Password | Password | The password for the Administrator user for the target Collective Controller | No |
| Admin User Name | String | An Administrator user for the target Collective Controller | No |
| Collective Controller Host Name | String | The host name of the Collective Controller that will route the startServer request to serverHost. If controllerHost is specified, controllerPort, admin user/password, trustStore/trustStorePassword, and serverHost must also be given. |
No |
| Collective Controller Port | String | The HTTPS port number of the target Collective Controller | No |
| Server Host Name | String | The name of the collective host where the server to start resides | No |
| Server Name(s) | String | The name of the server(s) to start. Multiple server names are separated by commas. Specify ALL to start all servers in wlp.user.dir. |
Yes |
| Trust Store File Path | String | The path to the trust store to be used when connecting to the collective controller | No |
| Trust Store Password | Password | The password for the trust store file. | No |
| WebSphere Liberty Installation Directory | String | The base directory of the WebSphere Liberty profile installation. For example: /opt/IBM/WebSphere/Liberty/. This path is on the host where the server being started resides. |
Yes |
| WebSphere Liberty User Directory | String | The directory where WebSphere Liberty server configuration is held. Specify a value here when ${wlp_install_dir}/usr is not writable. |
No |
Stop Application
Stop an application in the WebSphere Liberty profile.
| Name | Type | Description | Required |
|---|---|---|---|
| Application Name | String | The name of the application to stop. | Yes |
| Password | Password | The password for WebSphere Liberty. | Yes |
| Server HTTPS Port | String | The HTTPS port of the server. | Yes |
| Server Hostname | String | The host name or IP address of the server. | Yes |
| Trust Store File Path | String | The path to the trust store file. This path can be relative or absolute. | Yes |
| Trust Store Password | Password | The password for the trust store file. | Yes |
| User Name | String | The user name for WebSphere Liberty. | Yes |
Stop Server
Stop one or more servers in the WebSphere Liberty profile. This step will create output properties named stoppedServers, alreadyStoppedServers, and failedServers. Servers that were successfully stopped will be listed in the stoppedServers output property. Servers that were already in the stopped state will be listed in the alreadyStoppedServers output property. Servers that failed to stop will be listed in the failedServers output property.
| Name | Type | Description | Required |
|---|---|---|---|
| Admin Password | Password | The password for the Administrator user for the target Collective Controller | No |
| Admin User Name | String | An Administrator user for the target Collective Controller | No |
| Collective Controller Host Name | String | The host name of the Collective Controller that will route the stopServer request to serverHost. If controllerHost is specified, controllerPort, admin user/password,trustStore/trustStorePassword, and serverHost must also be given. | No |
| Collective Controller Port | String | The HTTPS port number of the target Collective Controller | No |
| Server Host Name | String | The name of the collective host where the server to stop resides | No |
| Server Name(s) | String | The name of the server(s) to be stopped. Multiple server names are separated by commas. Specify ALL to stop all servers in wlp.user.dir. |
Yes |
| Trust Store File Path | String | The path to the trust store to be used when connecting to the collective controller | No |
| Trust Store Password | Password | The password for the trust store file. | No |
| WebSphere Liberty Installation Directory | String | The base directory of the WebSphere Liberty profile installation. For example: /opt/IBM/WebSphere/Liberty/. This path is on the host where the server being stopped resides. |
Yes |
| WebSphere Liberty User Directory | String | The directory where WebSphere Liberty server configuration is held. Specify a value here when ${wlp_install_dir}/usr is not writable. |
No |
Uninstall Application from Dropins
Uninstall an application from the WebSphere Liberty profile by using the dropins directory.
| Name | Type | Description | Required |
|---|---|---|---|
| Server Name | String | The name of the server to uninstall the application from. | Yes |
| Source File Name | String | The full name of the archive file to uninstall. For example: JPetStore.war | Yes |
| WebSphere Liberty Installation Directory | String | The base directory of the WebSphere Liberty profile installation. For example: /opt/IBM/WebSphere/Liberty/ |
Yes |
| WebSphere Liberty User Directory | String | The directory where WebSphere Liberty server configuration is held. Specify a value here when ${wlp_install_dir}/usr is not writable. |
No |
Uninstall Application with Server XML
Uninstall an application in the WebSphere Liberty profile by editing the server.xml file.
| Name | Type | Description | Required |
|---|---|---|---|
| Application Name | String | The name of the application to uninstall. | Yes |
| Server Name | String | The name of the server to uninstall the application from. | Yes |
| WebSphere Liberty Installation Directory | String | The base directory of the WebSphere Liberty profile installation. For example: /opt/IBM/WebSphere/Liberty/ |
Yes |
| WebSphere Liberty User Directory | String | The directory where WebSphere Liberty server configuration is held. Specify a value here when ${wlp_install_dir}/usr is not writable. |
No |
Unregister Host
Unregisters a host and all of its associated servers from the collective.
| Name | Type | Description | Required |
|---|---|---|---|
| Admin Password | Password | The password for the Administrator user for the target Collective Controller | Yes |
| Admin User Name | String | An Administrator user for the target Collective Controller | Yes |
| Collective Controller Host Name | String | The host name of the target Collective Controller | Yes |
| Collective Controller Port | String | The HTTPS port number of the target Collective Controller | Yes |
| Host Name | String | The name of the host that will be unregistered from the Collective | Yes |
| WebSphere Liberty Installation Directory | String | The base directory of the WebSphere Liberty profile installation, such as /opt/IBM/WebSphere/Liberty/ | Yes |
| WebSphere Liberty User Directory | String | The directory where WebSphere Liberty server configuration is held. Specify a value here when ${wlp_install_dir}/usr is not writable. |
No |
Update Host
Updates the authentication information for a host that has been registered with the collective.
| Name | Type | Description | Required |
|---|---|---|---|
| Additional command arguments | String | Any additional arguments that should be passed to the collective registerHost command | No |
| Admin Password | Password | The password for the Administrator user for the target Collective Controller | Yes |
| Admin User Name | String | An Administrator user for the target Collective Controller | Yes |
| Collective Controller Host Name | String | The host name of the target Collective Controller | Yes |
| Collective Controller Port | String | The HTTPS port number of the target Collective Controller | Yes |
| Host JAVA_HOME Path | String | The path to the Java home directory for the registrant. | No |
| Host Name | String | The name of the registered host that will be updated within the Collective | Yes |
| Host Read Path | String | A readable path for the file transfer operations originated from the controller. Specify multiple paths on separate lines. |
No |
| Host Write Path | String | A writable path for the file transfer operations originated from the controller. Specify multiple paths on separate lines. |
No |
| RPC User | String | The user with which to authenticate to the RPC mechanism | No |
| RPC User Password | Password | The password for the rpcUser. Only one authentication option (rpcUserPassword or sshPrivateKey) should be used, but not both. | No |
| SSH Private Key Password | Password | The password for the specified SSH key | No |
| SSH Private Key Path | String | The path to the SSH key to use to authenticate to the host. Only one authentication option (rpcUserPassword or sshPrivateKey) should be used, but not both. |
No |
| WebSphere Liberty Installation Directory | String | The base directory of the WebSphere Liberty profile installation, such as /opt/IBM/WebSphere/Liberty/ | Yes |
| WebSphere Liberty User Directory | String | The directory where WebSphere Liberty server configuration is held. Specify a value here when ${wlp_install_dir}/usr is not writable. |
No |
Upload File To Collective Host
Upload a file to the target collective host. The target host must already be registered with the collective.
| Name | Type | Description | Required |
|---|---|---|---|
| Admin Password | Password | The password for the Administrator user for the target Collective Controller | Yes |
| Admin User Name | String | An Administrator user for the target Collective Controller | Yes |
| Collective Controller Host Name | String | The host name of the target Collective Controller | Yes |
| Collective Controller Port | String | The HTTPS port number of the target Collective Controller | Yes |
| Install Target Directory/File | String | The path on the target host where the source file will be installed/expanded. If source file is not a zip to be expanded, this value must be a file path, not a directory. |
Yes |
| Source File Path | String | The path to the file to upload to the target machine | Yes |
| Target Host Name | String | The name of the collective host the file will be uploaded to | Yes |
| Trust Store File Path | String | The path to the trust store to be used when connecting to the collective controller | Yes |
| Trust Store Password | Password | The password for the trust store file. | Yes |
Wait for Application to be STARTED
Wait for an application to run (have a status of Started).
| Name | Type | Description | Required |
|---|---|---|---|
| Application Name | String | The name of the application. | Yes |
| Password | Password | The password for WebSphere Liberty. | Yes |
| Server HTTPS Port | String | The HTTPS port of the server. | Yes |
| Server Hostname | String | The host name or IP address of the server. | Yes |
| Timeout (seconds) | String | The maximum time to wait, in seconds. | Yes |
| Trust Store File Path | String | The path to the trust store file. This path can be relative or absolute. | Yes |
| Trust Store Password | Password | The password for the trust store file. | Yes |
| User Name | String | The user name for WebSphere Liberty. | Yes |
Examples
Creating a collective and installing a simple application
The CreateCollectiveSampleApp.zip file contains an example HCL Launch application that creates a WebSphere Liberty collective and deploys a simple web application to the servers in the collective. The sample application runs processes to complete the following tasks:
- Create a Liberty server and collective.
- Register a target host with the collective.
- Upload a Liberty package file to the registered host.
- Join Liberty member servers from the package file to the collective.
- Start collective member servers.
- Deploy a simple application to the collective servers.
The example HCL Launch application assumes that you have two hosts. One host (the collective controller host) must be running the HCL Launch agent software and also must have WebSphere Liberty installed.
Import the example application archive to your HCL Launch server. When you import the application, select Import with Snapshots.
After you import the example application archive, complete the following steps.
- Create a top-level resource directory, and then add the agent that is running on the collective controller host to the new top-level resource.
- Add the WebSphereLiberty and HelloWorld components under the agent.
- Go to the Test environment of the ConfigureLibertyCollective application, and then click Add Base Resources to add the new resource tree as the base resource of the Test environment.
- Set the environment properties for the Test environment so that the values are correct for your specific environment. Change the values for all properties other than the Collective Controller Hostname, Controller Name, and Controller Port properties. Click the Configuration tab for the Test environment, and then click Environment Properties to set the values. After you enter all of the property values, click Save.
- You can now run the CreateConfigureDeployCollective application process on the Test environment. In the Run Process window, select the Version1 snapshot.
The process runs and installs the HelloWorld application to the member servers of the Liberty collective. Browse to the following URLs to see the output of the HelloWorld applications. The application output is Hello Tom.
https://targetHostName:9444/HelloWorld/Hello
https://targetHostName:9445/HelloWorld/Hello
https://targetHostName:9446/HelloWorld/Hello
You can also see information about the new collective by adding the Liberty Admin Center feature to the server.xml file for the controller1 server. On the collective controller host, add the following line to the LibertyInstallDir/usr/servers/controller1/server.xml file:
<feature>adminCenter-1.0</feature>
Browse to the following URL to access the Liberty Admin Center:
https://CollectiveControllerHost:9443/adminCenter
Log in to the Liberty Admin Center. For the sample application, the default administrator ID is admin and the default password is adminpwd. Click the Explore icon to display the applications, servers, and other information that is associated with the collective that the sample application created.
Installing an application on WebSphere Application Server Liberty Profile
The following component process installs a Java EE application on the WebSphere Application Server Liberty Profile. In this example, the application binary files are in the component. Also, the environment contains an installation of the Liberty profile and a server that is running. The process runs the following steps in order:
- The Download Artifacts step retrieves the binary files.
- The Install or Update Application with Drop-ins step installs the application.
- The Start Application starts the application.
- The Wait for Application to be STARTED step pauses the process until the application starts.
Article: Deploying Liberty (Part 1)
HCL Launch provides a suite of tools to handle the build, release, and deployment phases of larger DevOps cycles. HCL Launch handles automating application deployments. It provides continuous delivery during agile development, and the auditing trails, version support, and approval trails needed in production. This article describes how to set up the deployment of a single Liberty server.
Before you start, access the HCL Launch Documentation in the HCL Information Center to install and set up your HCL Launch environment.
- I used HCL Launch 7.1.2 but the instructions apply to previous versions as well.
- Be aware that you will need access to a License server to complete the install.
- Install the IBM Websphere Liberty plug-in, an add-on to the base HCL Launch Server.
The order in which the HCL Launch objects are created in this article is slightly different from the recommended path:
Application → Components → Resources/agents → Environments
This is so that you can test a component process in isolation once the component is added to the application. This eliminates the need to create an application process before testing a component. This also allows the option of grouping any properties that can be re-used across components under the application property section.
The order recommended by the HCL Launch tutorial documentation is to create the components before the application.
1. Creating the HCL Launch Liberty application
An application is the collection of the components needed for automated deployment. Artifacts are the application files need for installation and components encapsulate the artifacts needed to install an application.
Create the Liberty application on the HCL Launch dashboard:
- From the Applications tab, click Create Application > New Application and give the application a name, such as
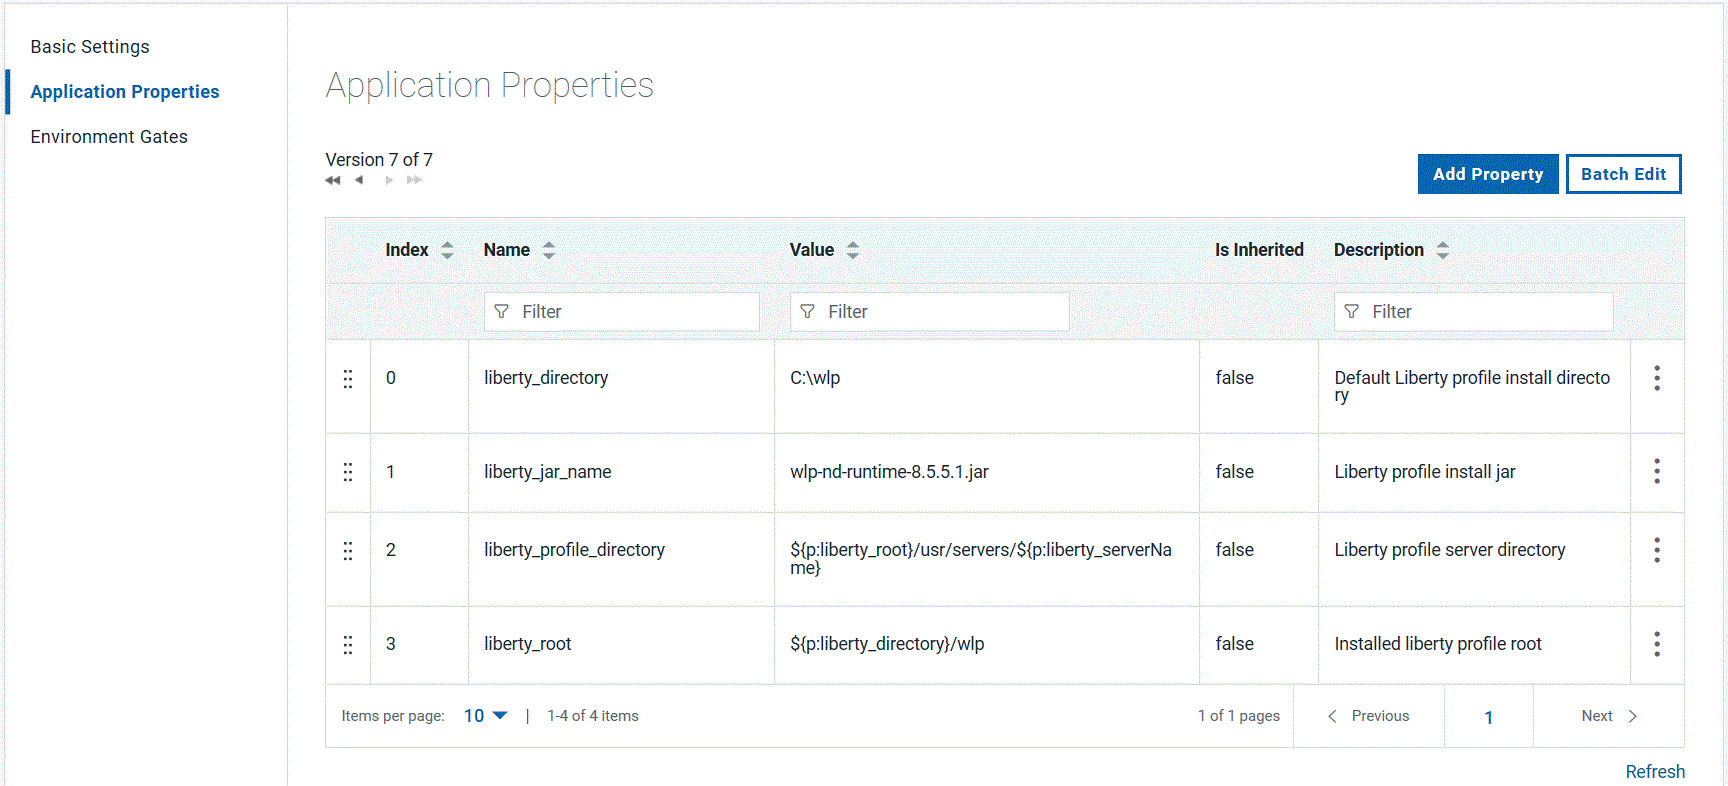
Liberty Profile Application. - Any properties that can be referenced across multiple component designs can optionally be added to the application property section. Add the following properties:
liberty_directory, which resolves to the Liberty profile installation directory.liberty_jar_name, which resolves to the name of the installation JAR file.liberty_profile_directory, which resolves to the location of the Liberty profile server directory.liberty_serverName, which resolves to the name of the Liberty profile server.liberty_root, which resolves to the Liberty profile installation root directory.
Most of the properties used in the Liberty component process design are defined under Liberty Profile Application > Configuration > Application Properties. The same property can have different values by doing a re-declaration at the component, environment, and/or resource level. The property value is resolved based on object precedence.
There are exceptions: for example; properties referenced in the component ‘basic setting’ panel did not resolve when only declared in the application property section. I added the following property in the component properties section.
liberty_install_resp, which resolves to the installation location of Liberty Repository.
See Properties in the Information Center.
You have now created an application called Liberty Profile Application. In the next section, create a component in the application called Liberty Component.
2. Creating an HCL Launch Liberty component
A component is the primary container for artifacts needed for the installation of the application. In this article, the Liberty Profile Installation file is the artifact.
- Click Create New Component and name the component
Liberty Component. - Set Source Config Type to File System (Versioned). This is where the HCL Launch retrieves the artifacts from. Other sources such as Subversion and Maven are also supported.
- In the Base Path field, type the name of the
liberty_install_resp. This field does not auto-complete so ensure that you enter the name in the correct format (see Using properties). - Check the Import Versions Automatically option. This makes HCL Launch poll for new artifact versions to manage.
- Check the Copy to CodeStation. This imports artifacts into the CodeStation. The amount of data in CodeStation can become an issue so you can configure the lifecycle of artifacts in CodeStation in the Settings view.
- Select the Use the system’s default version import agent/tag option to trigger the application processes using the system default agent/tag.
You have now created a component for the Liberty Profile Installation file by filling in the basic component information. Next, you must create the set of component processes needed to act on the Liberty Profile artifact.
3. Creating the component process
Create a process for the component Liberty Component.
- Click Create Process from the Processes tab and name the process as
Liberty Profile Install. - Set the Process Type to Deployment and the Inventory Status to Active.
- During deployment automation execution, the target system’s local HCL Launch agent creates a default working directory with the component name. The target system’s local agent will download and store the component artifact in this default directory. By default, HCL Launch sets a server property as a reference to the component’s Default Working Directory value. You can reference the same server property in your process design. Notice the Default Working Directory field is set by default.
You have now created the component process.
4. Creating the process design
We will now create the Liberty Profile Install process design for the Liberty Profile component with the following steps:
- Stop the previously running Liberty Profile.
- Delete the previous Liberty Profile installation.
- Download the Liberty Install artifact to a component default working directory on the target system.
- Install Liberty profile.
- Create the Liberty profile server.
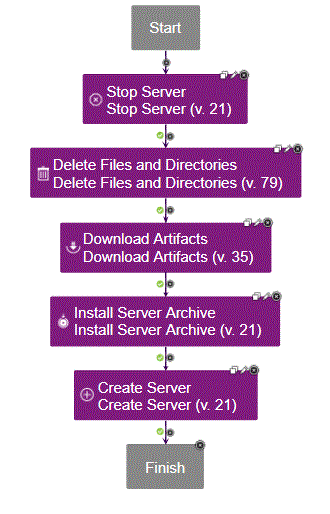
TIP: Create component processes as though the target systems already have an active deployment; in this example, Liberty Profile. Processing optionally continues past steps 1 and 2 if the server is not running or installed.
All of the following steps for the process design are available in the IBM WebSphere Liberty plug-in. You just need to add them to the design and configure certain settings.
- Add the Liberty Profile Stop Server step to the process design.
- In the Server Name field, type the name of the application property
liberty_serverName. Manage component and application properties from the Configuration panel (see also Using properties). - In the WebSphere Liberty Installation Directory field, type the name of the application property
liberty_root. - Leave the Working Directory field empty; it defaults to previously discussed Default Working Directory. HCL Launch creates a working directory with the name of the component. You can optionally reference the component’s default working directory as
${p:resource/work.dir}/${p:component.name}.
- In the Server Name field, type the name of the application property
- Add the Liberty Profile Delete Files and Directories step to the process design.
- Set Working Directory to the installed Liberty server location.
- Set Base Directory to the current working directory.
When you change the working directory path, remember to review the Base Directory and Working Directory values. The base directory value is appended to the working directory value during process execution.
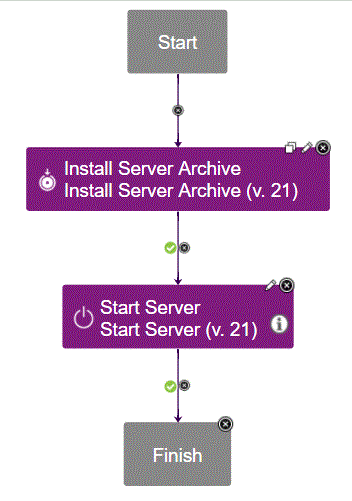
- Add the Download Artifacts step to the process design. Accept the default settings of this design step.
- Add the Liberty Profile Install Server Archive step to the process design.
Reference the application propertiesliberty_serverNameandliberty_rootagain in this step. - Add the Liberty Profile Create Server step to the process design.
Define other Liberty Profile component processes to be used with Liberty Profile application processes. The Liberty plug-in is used in designing the following component processes:
Component Process Design: Uninstall Liberty Server
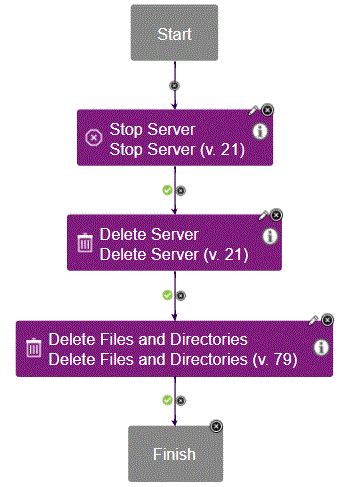
Both steps use the Liberty plug-in support.
Component Process Design: Start Liberty Server
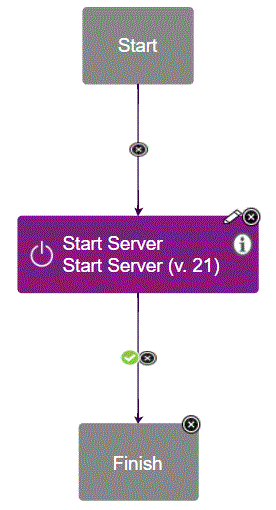
Component Process Design: Stop Liberty Server
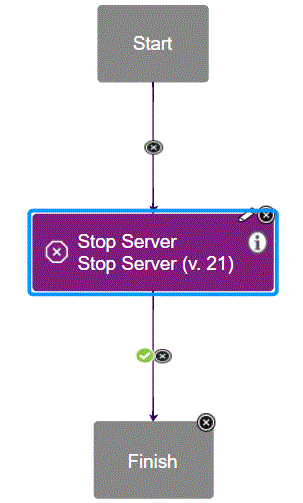
The Liberty Profile Stop Server step uses Liberty plug-in support.
5. Integrating the component into the Liberty Profile application
With the Liberty Profile component processes created, associate the component with the Liberty Profile application. In the application, click Add Component and select the component name.
6. Creating resources for the Liberty Profile application
Resources are generally the HCL Launch application deployment targets; a server, for example. Any systems with HCL Launch agents installed will show up in the Resources > Agents panel of the administration dashboard. Include agents in new or existing top-level group declarations to make them available for application deployments.
- Create a top-level group called
Liberty Windows Group. - Add any target deployment system agents to the group. For the component processes to run, the component needs to be registered with the system agent.
- Add the component to an agent in the Resource view.
7. Creating an application environment
- With the resources in place, create an application environment for
Liberty Profile. - To complete creating the environment, add a top-level group resource.
8. Creating processes for the Liberty Profile application
With component, resource, and environment declared, the Liberty Profile application needs processes to manage the component process execution.
Create an application process:
- Click Create New Process.
- Name the process
Liberty Profile Install. - In the Inventory Management field, select Automatic.
- In the Offline Agent Handling field, select Check Before Execution.
- Add a Liberty Profile component > Liberty Profile Install step to the new application process design.
- Add a Liberty Profile component > Liberty Profile Start Server step to the application process design.
- Organize the application process design steps as follows:
- Make sure that before doing a full deployment, test component processes. Access the Component page of the application, click Run Process, then click Submit to run the component process.
9. Running the deployment process
You’re now ready to run the deployment automation:
- Click the Request Process button next to the Environment definition to start the deployment.
- Clear the Only Changed Versions check box to force the overlay of previous deployments. This is useful for deployment automation testing.
The submitted process automation displays in an execution panel. The process request starts and completes a single Liberty deployment.
If you want to deploy across more servers, add additional agents to a new or existing top-level group resource. Applications deploy across multiple resources by adding them to an existing or new environment. Creating additional HCL Launch environments is another way to group systems and control deployments because environments are a specified option in running the application process.
In Part 2, we install a simple server application with the Liberty deployment.
Article: Deploying Liberty (Part 2)
Part 1 described how to set up a single Liberty server deployment using HCL Launch. In this article, we use the Liberty Profile application deployment from Part 1, and expand it to include a sample installation. Part 2 walks through adding updates to the Liberty Profile component to install a snoop application on a Liberty server.
1. Creating the Snoop component
This article uses a Snoop application as an example. You can use any simple application in place of Snoop.
The Snoop installation will go in a new HCL Launch component. The component declaration for the Snoop installation is similar to the Liberty Profile component that we created in Part 1. The difference for the new component declaration is the artifact is the Snoop WAR file.
- Click Create New Component.
- Enter the details for the new component for the Snoop application:
- Name: Snoop Application
- Source Config Type: File System (Versioned)
- Base Path: ${p:snoop_rep}
- Add an install process to the Snoop Application component:
- Name: Install Snoop Application
- Process Type: Deployment
- Inventory Status: Active
- Default Working Directory: ${p:resource/work.dir}/${p:component.name}
The “Download Snoop Artifact” step of the “Install Snoop Application” process for the “Snoop Application” component is similar to the Liberty Profile > Process > Liberty Profile Install > Download Artifact step. The snoop.war file is downloaded to the local system in a working directory.
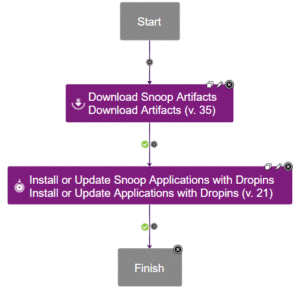
This step is also supported through the Liberty plug-in. The “Install or Update Snoop Applications via Dropins” step of this Install Snoop Application process uses the liberty_serverName and liberty_root application properties defined under the Liberty Profile application. The same properties were also used in the Liberty Profile component.
2. Updating the Liberty Profile component
Create Liberty Profile component processes to start and stop a Liberty server:
- Go to Components > Liberty Profile > Processes > New Process:
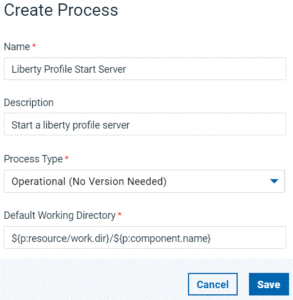
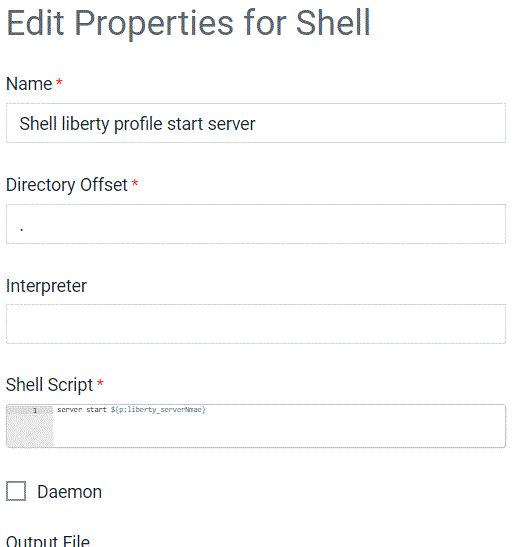
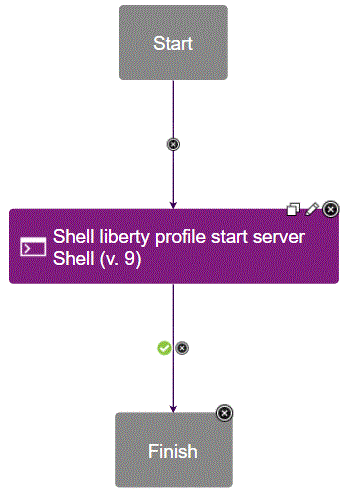
The Process Type field is set to Operational (No Version Needed) since this process runs a server command. - Use the Shell plug-in to start the Liberty server. Edit the Shell plug-in properties.
- The Liberty Profile Start Server process is now created.
- The Working Directory and Shell Script fields use properties declared at the Liberty Profile application level.
- The Daemon option is enabled to allow step processing to continue. Tests without Daemon enabled caused processing to stop until the Liberty server shutdown has completed.
- Create Liberty Profile Stop Server process. The Liberty Profile Stop Server and Start Server process setups are similar.
The “Stop Server” design setup uses the “Stop Server” support of the Liberty plug-in. Values for the Liberty Server Name and WebSphere Liberty Installation Directory root are required. Both fields use properties declared at the Liberty Profile application level (Liberty Profile Start Server > Design > Liberty Profile Stop Server):
3. Configuring environment properties
Declare component environment properties to update a template server.xml file and then add it to the Liberty Profile installation JAR file location. You then download both the install JAR file and the server.xml file as HCL Launch artifacts.
- Update the template
server.xmlfile with tokens:
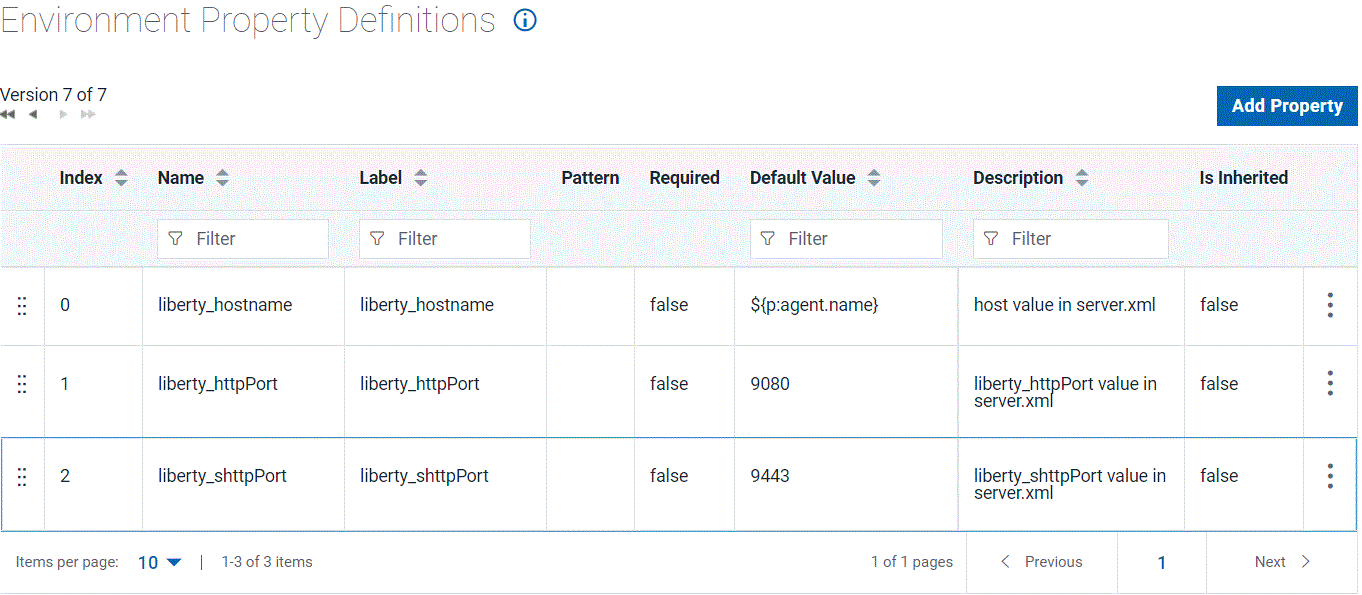
The default HCL Launch token characters('@')enclose the environment variables added in theserver.xmlfile. In this example,liberty_hostname,liberty_httpPort, andliberty_shttpPortare the tokens. - Declare the same environment properties in the Liberty Profile component > configuration > Environment Property Definitions panel:
The value forliberty_hostnameis set to the agent system propertyagent.name. By default,agent.nameis set to the system host name declared during agent installation. All the tokens in theserver.xmlfile will be resolved during process execution with a call to the “replace token” process plug-in. - Add a process to the Liberty Profile component to download the
server.xmlartifact and do the token replace.
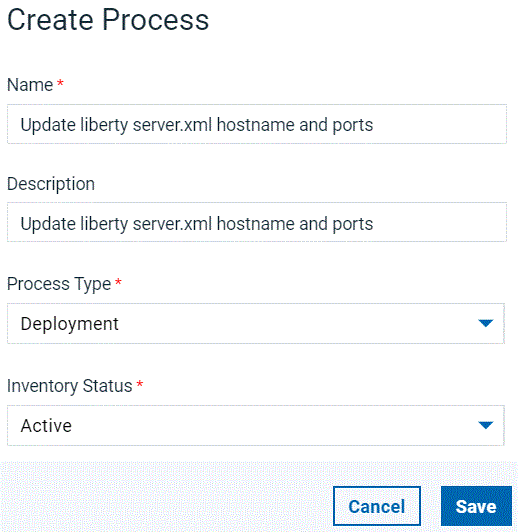
The Update liberty server.xml hostname & ports process is created. Create the process as follows:
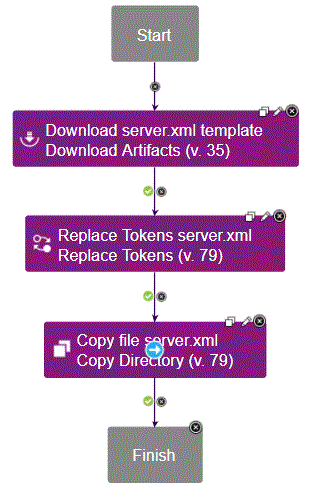
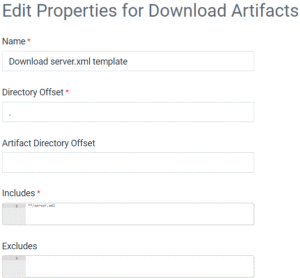
- Create the first step; Download Artifacts:
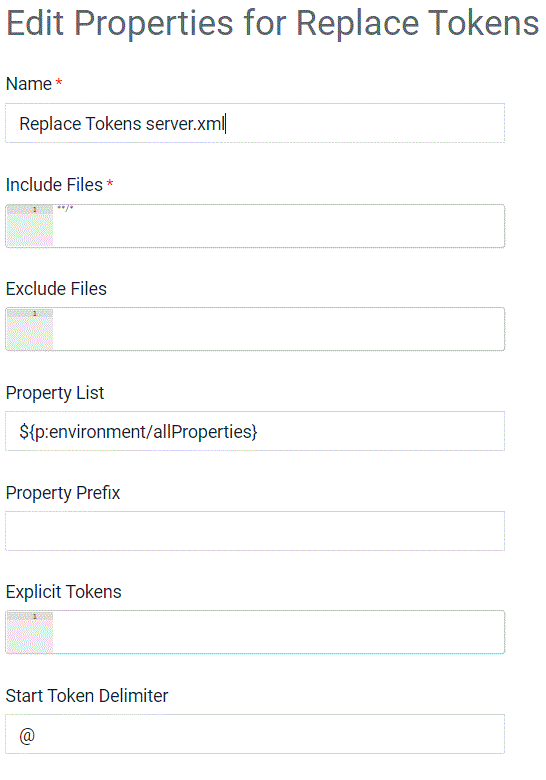
The Includes field is set to only download theserver.xmlto a local working directory. - Create the second step; Replace Tokens:
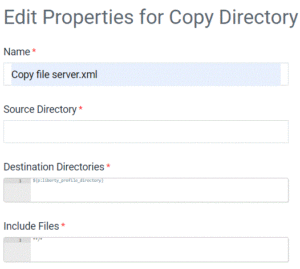
Accept all the default settings in this step. - Create the third step; Copy Directory:
- Create the first step; Download Artifacts:
When Update liberty server.xml hostname & ports runs during deployment, the updated server.xml file will look like this:

4. Updating the agent resource
Add the Snoop Application component to the Liberty Profile application, and update the agent resource for the Liberty Profile application to allow the ‘Snoop’ component processes to run.
- Update the Liberty Profile application by adding the Snoop App component.
- Update the agent resource by adding the Snoop Application component to it.
5. Updating the Liberty Profile application
Create a process in the Liberty Profile application to include the Snoop Application component during a Liberty server installation:
- Go to Home > Liberty Profile Application > Processes and create Liberty Profile Install + Snoop Install process.
- The Liberty Profile Install step is the same as previously defined.
- In the second step, add the Install Component plug-in. The step calls the Liberty Profile component process that handles the
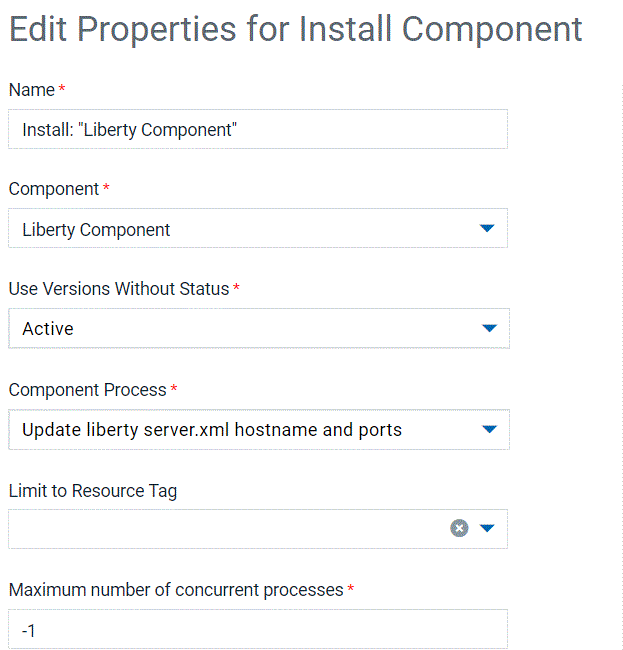
server.xmltemplate environment propertytoken resolution:
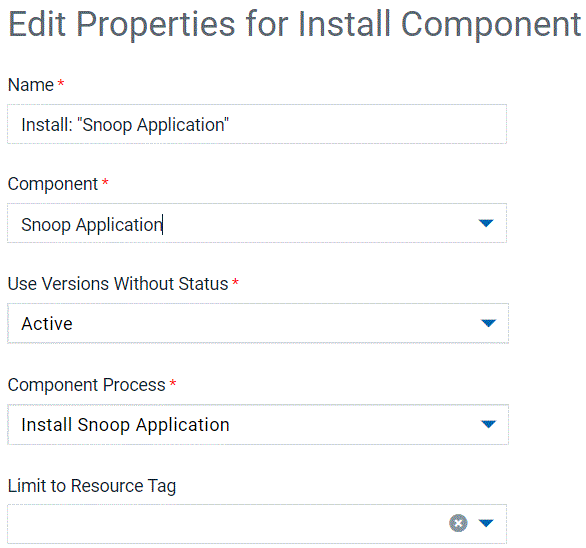
- In the third step, add another Install Component plug-in. The Install Snoop step calls the Snoop Application component > Install Snoop Application process.
- The fourth step, Start the Liberty Server, which runs after installation, uses the component process.
The setup is now complete for the Liberty Profile application > Liberty Profile Install + Snoop Install deployment process.
6. Running the Liberty Profile Install + Snoop Install
To run the deployment process:
- Click Run Process.
- View the execution panel to check progress.
- Verify the deployment on the local system in the Liberty logs.
console.log:
Starting Liberty with snoop.
Messages.log:


You can also access Snoop on the Liberty server in a browser:

Troubleshooting
If, when importing artifacts into the code station, the thread that handles artifact copying hangs on previously queued requests, locate the hung request and cancel it. Running version requests appear under the component panels.
You can reduce the chance of a hung “component>version“` request by limiting the enabling of automatic imports.