Quick Info
Description
IBM API Connection is an application programming interface (API) management platform that uses Loopback to create, assemble, and manage web APIs. The IBM API Connection plug-in provides steps to publish API Definitions and Loopback Apps to an API Connect server. This plug-in communicates to API Connect through the use of the API command-line toolkit.Quick Info
 Summary
 Usage
Usage Steps
Steps Troubleshooting
Summary
The API Connect plugin includes steps that publish API definitions, products, and Loopback apps in IBM API Connect. The plugin communicates with API Connect using the apiconnect contained in the apic command line toolkit.
This plugin includes one or more steps, click Steps for step details and properties.
Compatibility
This plugin requires HCL Launch version 7.0.0 or later.
This plugin is compatible with agents running on operating systems that are supported by both HCL Launch and the apiconnect (apic) command line toolkit. This plugin does not support agents running on z/OS.
This plugin supports apic v2.0.18 and higher. Authentication issues exist within the apic toolkit. Click Troubleshooting for a workaround.
Installation
See Installing plugins in HCL Launch for installing and removing plugins.
History
The following table describes the changes made in each plugin version.
| Version | Description |
|---|---|
| 7 | Minor enhancements |
Installation
See Installing plugins in HCL Launch for installing and removing plugins.
History
The following table describes the changes made in each plugin version.
| Version | Description |
|---|---|
| 7 | Minor enhancements |
Usage
To use the plugin, the apiconnect (apic) command line toolkit must be installed. For installation information, see Installing the toolkit topic in the product documentation.
Step palette
To access this plugin in the palette, click IBM API Management > IBM API Connect.
To understand how to use the API Connect plugin this topic uses two component templates that are available. The two templates are located in a GitHub repository under IBM API Connect/Component.
- Publish Loopback Application
- Release API Product Definitions from Drafts
The API Connect templates provide a starting point for understanding the IBM API Connect plugin. The templates use the online version of BlueMix and requires a valid BlueMix account. See Build for free on IBM Cloud website to create a trial BlueMix account account. The templates requires some prerequisite steps to publish your first definition or project.
Publish Loopback Application
The Publish Loopback Application process takes a previously created Loopback application and publishes it to an API Connect instance. The catalog and application must be previously created on API Manager. Log into your Bluemix account for API Manager. Follow the prerequisite steps to prepare an application for deployment. If the prerequisite steps are followed, many of the predefined values in the template are untouched.
The following prerequisites are required.
- To create a loopback application, follow the steps in the Creating a LoopBack project from the command line which is part of the IBM API Connect documentation. After the steps are complete, the final application name and local folder is acme-bank. Make note of the path to the folder. This information is needed later.
- To create a catalog and app on API Manager, follow the first set of steps one through eight Publishing a project from the command line. It is not necessary to save the catalog and application identifiers. When completed,
- The name of the Catalog is Sandbox, with an ID of sb
- The name of the Application is Acme Bank, with an ID of acme-bank
Note: Do not follow any steps that point to using the command line.
HCL Launch steps
After the prerequisites are completed, the following tasks are done in HCL Launch.

- In the HCL Launch interface install the IBM API Connect plugin. Click tt > Components and then the Templates tab. The API Connect Publish Loopback Application template should be in the template list. Open the template.
- Click Create Component.
- Fill out the form. If the prerequisite steps were followed, many of the required fields can be ignored or require minimal modifications. Specifically,
home_dir/home_dirrefers to the path leading up to the required folder or definition. This is the location where the application was created in the create application prerequisite step. The Organization is a modification of your user name. If you are unsure, it can be found in the API Manager console. Update the username and password with your credentials. If the prerequisite steps were not followed, all of the required fields must be edited.Note: While the Version Source Configuration is required, it is ignored in this template process.
- Click Save.
- Create a new application, attach the newly created Component, assign the Component an agent resource, and run the Publish Loopback Application process.
- You can verify the newly published Loopback application by viewing the products within the Sandbox catalog on the API Connect console.
Note: In apic version 1.0.2, you may experience an authentication error when deploying a Loopback app. If so, refer to the troubleshooting page to resolve the issue.
Template Process
This template is composed of six steps:
- Login
- Set Configuration Variable App
- Set Configuration Variable Catalog
- Publish API Product Definitions
- Publish an Application
- Logout
Release API Product Definitions from Drafts
The Release API Product Definitions from Drafts template takes a previously definition YAML file, saves it to Drafts, and then publishes it to an API Connect instance. The catalog and application must be previously created on API Manager.
The following prerequisites steps prepare a definition for deployment. If the prerequisite steps are followed, many of the templates predefined values may be left untouched.
- Create an API definition from the command line. You can use the directions in the Creating a LoopBack project from the command line topic.
- Open a command line interface and issue the following commands:
apic create --type api --title Loansto create a sample local.yamldefinition.apic validate loans.yamlto validate that the.yamldefinition file was created correctly.apic create --type product --title "Banking Services" --apis loans.yamlto create the final product definition named: banking-services.yaml. Record the location of this file, this information is needed later.
- Create a catalog on API Connect. Follow the first set of steps one through four here. It is not necessary to save the catalog and application identifiers. When completed, the name of the Catalog is Sandbox, with an ID of sb. The same Sandbox catalog may be reused if it has been previously created.
HCL Launch steps
After the prerequisites are completed, the following tasks are done in HCL Launch.
- In the HCL Launch user interface, install the IBM API Connect plugin, click the Components, and then the Templates tab. The API Connect Release API Product Definitions from Drafts template should be in the template list. Enter the template.
- Click the Create Component.
- Fill out the form. If the prerequisite steps were followed, many of the required fields can be ignored or require minimal modifications. Specifically,
refers to the path leading up to the API product definition. This is the location where the product was created in the prerequisite steps. The Organization is a modification of your username. If you are unsure, it can be found in the API Manager console. Lastly, update the username and password with your credentials. If the prerequisite steps were not followed, all of the required will need to be edited. Note: While the Version Source Configuration is required, it is ignored in this template process.
- Click Save.
- Create a new Application, attach the newly created Component, assign the Component an agent resource, and run the Release API Product Definitions from Drafts process.
- The newly published API product definition can be verified by viewing the products within the Sandbox catalog on the API Connect console.
Note: The loans.yaml file created in the prerequisite steps, might not have the correct gateway assigned causing an error to occur while pushing or publishing a API definition. Refer to the troubleshooting page to resolve this issue.
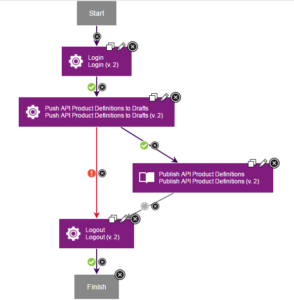
Template Process
This template is composed of four steps:
- Login
- Push API Product Definitions to Drafts
- Publish API and Product Definitions
- Logout
Steps
The following process steps are available in the IBM API Connect plugin.
- Login
- Logout
- Publish API Product Definitions
- Publish an Application (API Connect v5.x)
- Push API Product Definitions to Drafts (API Connect v5.x)
- Replace Product in Catalog
- Set Configuration Variable
- Supersede Product in Catalog
Login
Authenticate with an API Connect cloud through the management server.
This step is a prerequisite for all other steps in the IBM API Connect plugin. (apic
login)
| Name | Type | Description | Required |
|---|---|---|---|
| APIC Tool Path | String | The full path to the apic command-line tool. For example: C:\Users\John\AppData\Roaming\npm\apic.cmd | No |
| Password | Password | The password to use to authenticate with the API Connect management server. | Yes |
| Realm | String | The identity provider used to authenticate and the scope of the tasks that can be performed (I.E. provider/default-idp-2). This field is required if using the API Connect v2018 toolkit. |
No |
| Server | String | The API Connect management server endpoint to authenticate with. For example, the IBM Bluemix endpoint is us.apiconnect.ibmcloud.com. |
Yes |
| Username | String | The user name to use to authenticate with the API Connect management server. | Yes |
Logout
Remove local authentication credentials for an API Connect cloud.
Run this step at the end of each deployment process. (apic logout)
| Name | Type | Description | Required |
|---|---|---|---|
| APIC Tool Path | String | The full path to the apic command-line tool. For example: C:\Users\John\AppData\Roaming\npm\apic.cmd | No |
| Server | String | The API Connect management server endpoint to remove credentials from. For example, the IBM Bluemix endpoint is us.apiconnect.ibmcloud.com. |
Yes |
Publish API Product Definitions
Publish the API product and referenced APIs to a catalog. (apic products:publish)
| Name | Type | Description | Required |
|---|---|---|---|
| API Product Definitions | String | The full path to the YAML file that contains the API or product definitions. | Yes |
| APIC Tool Path | String | The full path to the apic command-line tool. For example: C:\Users\John\AppData\Roaming\npm\apic.cmd | No |
| Catalog | String | The name of the catalog to deploy to. | Yes |
| Organization | String | The name of the provider organization. | Yes |
| Server | String | The management server endpoint to publish to. For example, the IBM Bluemix endpoint is us.apiconnect.ibmcloud.com. |
Yes |
| Space | String | Enter a space to deploy to (if applicable for this catalog) | No |
| Stage Status | Boolean | Select to keep the product in the staged state, instead of moving to published state. | No |
Publish an Application (API Connect v5.x)
Publish a Node.js (LoopBack) application to a provider application (apic apps:publish).
Note: This command is not supported if using API Connect v2018.x.
| Name | Type | Description | Required |
|---|---|---|---|
| APIC Tool Path | String | The full path to the apic command-line tool. For example: C:\Users\John\AppData\Roaming\npm\apic.cmd | No |
| Loopback Application | String | The name of the LoopBack application. | Yes |
| Loopback Project Directory | String | The full path to the directory that contains the LoopBack application. | Yes |
| Organization | String | The name of the provider organization. | Yes |
| Server | String | The management server endpoint to publish to. For example, the IBM Bluemix endpoint is us.apiconnect.ibmcloud.com. |
Yes |
Push API Product Definitions to Drafts (API Connect v5.x)
Push API product definitions to drafts on an API Connect cloud (apic drafts:push).
Note: This command is not supported with API Connect v2018.x.
| Name | Type | Description | Required |
|---|---|---|---|
| API Product Definitions | String | The full path to a YAML file that contains the API product definitions. Example: banking-services.yaml. | Yes |
| APIC Tool Path | String | The full path to the apic command-line tool. For example: C:\Users\John\AppData\Roaming\npm\apic.cmd | No |
| Organization | String | The provider organization name. | Yes |
| Product Only | Boolean | Select to push only the product. If not selected, the product and referenced APIs are pushed. |
No |
| Replace Named Version | String | The name and version of a definition to replace. Use the following format: Name:Version. For example: climbon:1.0.0 |
No |
| Server | String | The management server endpoint to push to. For example, the IBM Bluemix endpoint is us.apiconnect.ibmcloud.com. |
Yes |
Replace Product in Catalog
Replace a published or deprecated product in a catalog with another product (apic
products:replace)
The old product will be retired. The new product must be either staged, published,
or deprecated.
| Name | Type | Description | Required |
|---|---|---|---|
| APIC Tool Path | String | The full path or folder to the apic command-line tool. For example: C:\Users\John\AppData\Roaming\npm\apic.cmd | No |
| Catalog | String | The name of the catalog ncontaining the product to be replaced. | Yes |
| New Product | String | The new product to replace the old product, specified on the Old Product property. Use the format: NEW_PRODUCT_NAME:VERSION_NAME. |
Yes |
| Old Product | String | Select to replace the old product. Use the format: OLD_PRODUCT_NAME[:VERSION_NAME]. The :VERSION_NAME portion is optional. If if is not specified, the first published version of the product is replaced. |
Yes |
| Organization | String | The name of the provider organization. | Yes |
| Plan Mappings | String | A list of old to new product plan mappings. Specify each mapping on a new line in the format: SOURCE_PLAN_NAME:TARGET_PLAN_NAME. You must map all product plans. |
Yes |
| Server | String | The management server endpoint to set the variable on. For example, the IBM Bluemix endpoint is us.apiconnect.ibmcloud.com. |
Yes |
| Space | String | Enter a space to replace in (if applicable for this catalog). | No |
Set Configuration Variable
Set a configuration variable. You do not need to run the Login step before running this step. This is a wrapper step for the App and Catalog Identifier. If you have access to the Identifier, run that command through the Shell step. (apic config:set)
| Name | Type | Description | Required |
|---|---|---|---|
| APIC Tool Path | String | The full path to the apic command-line tool. For example: C:\Users\John\AppData\Roaming\npm\apic.cmd | No |
| App or Catalog Name | String | The name of an application or catalog to configure. | Yes |
| Config Variable Type | Enumeration | The type of variable to configure. Valid values are app and catalog. | Yes |
| Global | Boolean | The global configuration variable. | No |
| Local | Boolean | The local application configuration variable. | No |
| Organization | String | The name of the provider organization. | Yes |
| Server | String | The management server endpoint to set the variable on. For example, the IBM Bluemix endpoint is us.apiconnect.ibmcloud.com. |
Yes |
Supersede Product in Catalog
Supersede a published product in a catalog with another product (apic products:replace).
The old product is deprecated. The new product must be either staged, published, or
deprecated.
| Name | Type | Description | Required |
|---|---|---|---|
| APIC Tool Path | String | The full path or folder to the apic command-line tool. For example: C:\Users\John\AppData\Roaming\npm\apic.cmd | No |
| Catalog | String | The name of the catalog containing the product to be replaced. | Yes |
| New Product | String | The new product to supersed the old product. Use the format: NEW_PRODUCT_NAME:VERSION_NAME. |
Yes |
| Old Product | String | The name of the old product to be superseded. Use the format: OLD_PRODUCT_NAME[:VERSION_NAME]. The :VERSION_NAME portion is optional. If you is not specified, the first published version of the product is replaced. |
Yes |
| Organization | String | The name of the provider organization. | Yes |
| Plan Mappings | String | A list of old to new product plan mappings. Specify each mapping on a new line in the format: SOURCE_PLAN_NAME:TARGET_PLAN_NAME. You must map all product plans. |
Yes |
| Server | String | The management server endpoint to set the variable on. For example, the IBM Bluemix endpoint is us.apiconnect.ibmcloud.com. |
Yes |
| Space | String | Enter a space to supersede in (if applicable for this catalog). | No |
Troubleshooting
Login Step: ERROR {error:invalid_client,error_description:Unauthorized grant type: password}
IBM API Connect is beginning to introduce federated identity, and therefore, requires a workaround until it has been fully implemented. This incomplete authentication strategy creates issues after you have configured the catalog and app variable or attempt to push a Loopback app. The workaround is simple. Run the following command on the command line and login into Bluemix through the browser pop-up:
apic edit
After logging in, the required access token will be set locally. At this point the Login step can be ignored or removed and plugin steps may be called normally. If you use the Logout step, the access token will need to be regenerated via the above command. This resolution should only be necessary if you modify the app and catalog configuration settings or the Publish an Application step is used.
Publish an Application Step: ERROR Make sure you have logged in. ERROR
Refer to the resolution above.
ERROR API loans:1.0.0 with property gateway set to micro-gateway incompatible with Catalog Sandbox gateway datapower-gateway .
The command apic create --type api --title Loans, which is used in the tutorial, creates a simplified API definition that sets the gateway to micro-gateway. Unfortunately, this may not be the same gateway used in your catalog. The easiest way to resolve this issue, is to manually open the load.yaml file and change micro-gateway to the Catalogs gateway. The error message will tell you what gateway to change it to. In this example, the loan.yamls gateway need to be changed from micro-gateway to datapower-gateway. Refer to your error message for the correct gateway setting.
Other Errors
The apic toolkit is frequently being upgraded and improved. Ensure that your version of the apic toolkit is supported by this plugin. Supported versions and installation instructions can be found on the plugins Summary page.
Related Plugins